
To simplify the process of capturing leads and transferring information into your CRM, while reducing the workload on your colleagues, consider integrating Stinto with your CRM system.
There are two ways to set up your integration with Zapier currently. You can start with our templates for HubSpot or Pipedrive (more templates will be added continually) and use or adjust from there. Or you can set it up manually by setting up a Stinto trigger and automating the CRM actions that happen.
Before you begin consider what you want to happen in the workflow...
Zapier gives you many options to tailor the Zap exactly to your needs. It is, therefore, a good idea to think about or scribble down what you want to happen before you begin.
and create a Zapier account
Sign up for a free Zapier account, as this is needed to create a workflow 'zap' between the apps.
Setting up integration in Zapier
Creating a workflow (Zaps)
Zapier calls their automated workflows Zaps and they are built with triggers and actions. For example, if something specific happens on one platform (the trigger), something else will happen on another platform (the action).
In this example, we'll make a workflow 'zap' that creates a new contact in HubSpot when an employee shares a contact to the CRM in Stinto. You may need to make changes to the configuration depending on your CRM and or organisational workflow.
Luckily Zapier can accommodate most needs.
1. Create a new Zap
Once logged in hit the Create button > Create Zap (if you are not already in one)
You'll see this fresh workflow with a trigger event and an action event that has been created.

2. Set-up trigger
We need to tell Zapier when we want the data from Stinto to be sent to our CRM. This is done in the trigger step.
- Search and select Stinto
- Select trigger event. In this case, we want a new contact to be the trigger event.

- From your company dashboard in Stinto, head to Settings ⚙️ > Integrations > Get API Keys. You'll get both a Client ID and a API Key/Client Secret
- Save both the Client ID and the API Key/Client Secret as the latter will only be displayed once.

- Paste the information in You may be asked to authenticate your Stinto account

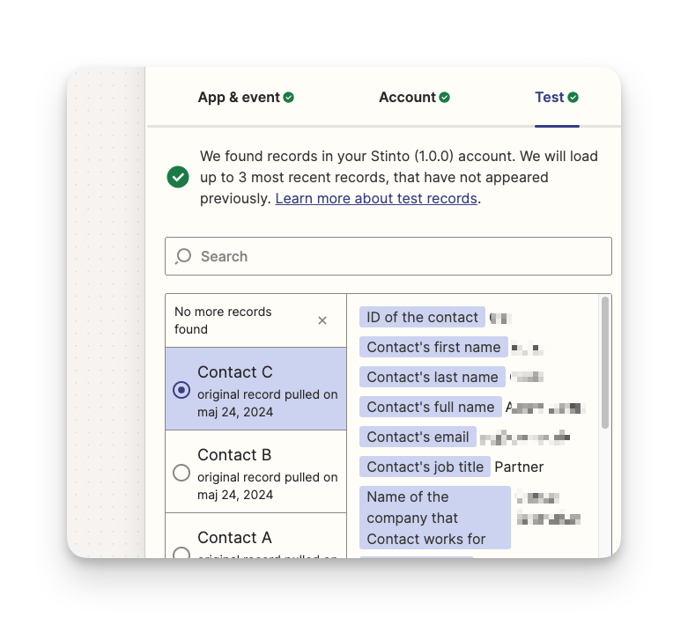
- Test the trigger

- If the test is successful you should see something like this. You can move on to setting up the action automation.
3. Set-up Action
Now the trigger is set we want to tell Zapier what we want to happen next
- Search and select your CRM, and select the action event. CRMs have a list of events available, so review the options and select the one best suited to your needs. In this case, we want 'Create or Update Contact'.

- Under account, you may be asked to authenticate/login to your account by following the instructions
- Configure the action and map data fields to where you want data to end up.
- Under action you now need to select the Stinto data that you want in the corresponding fields that your CRM system provide.
For example, the 'Contact's Email' property from Stinto should be mapped to the Contact Email field, in this case.
- These are the most important Stinto properties:
- Name
- Phone
- Job title
- Name of the company that the contact works for
- Notes
But there is a long list of Stinto properties that you can consider using for the best flow if information.
- Under action you now need to select the Stinto data that you want in the corresponding fields that your CRM system provide.
4. Testing the action
- When you run a test you will see what information is ending up where in your CRM.
- You'll also be be able to see the data in your CRM and check it there
- If something is not right, you can click 'action' and make adjustments.

You can add steps to your workflow and more make more advanced flows, by adding actions. The principles are the same.
5. Publish
When you are happy, go ahead and publish it

This is the help center from Zapier